Creating Challenges, Badges, Rewards and Setting Levels
- Log into https://splash-app.crm.co/ with the credentials provided to you by FayeBSG
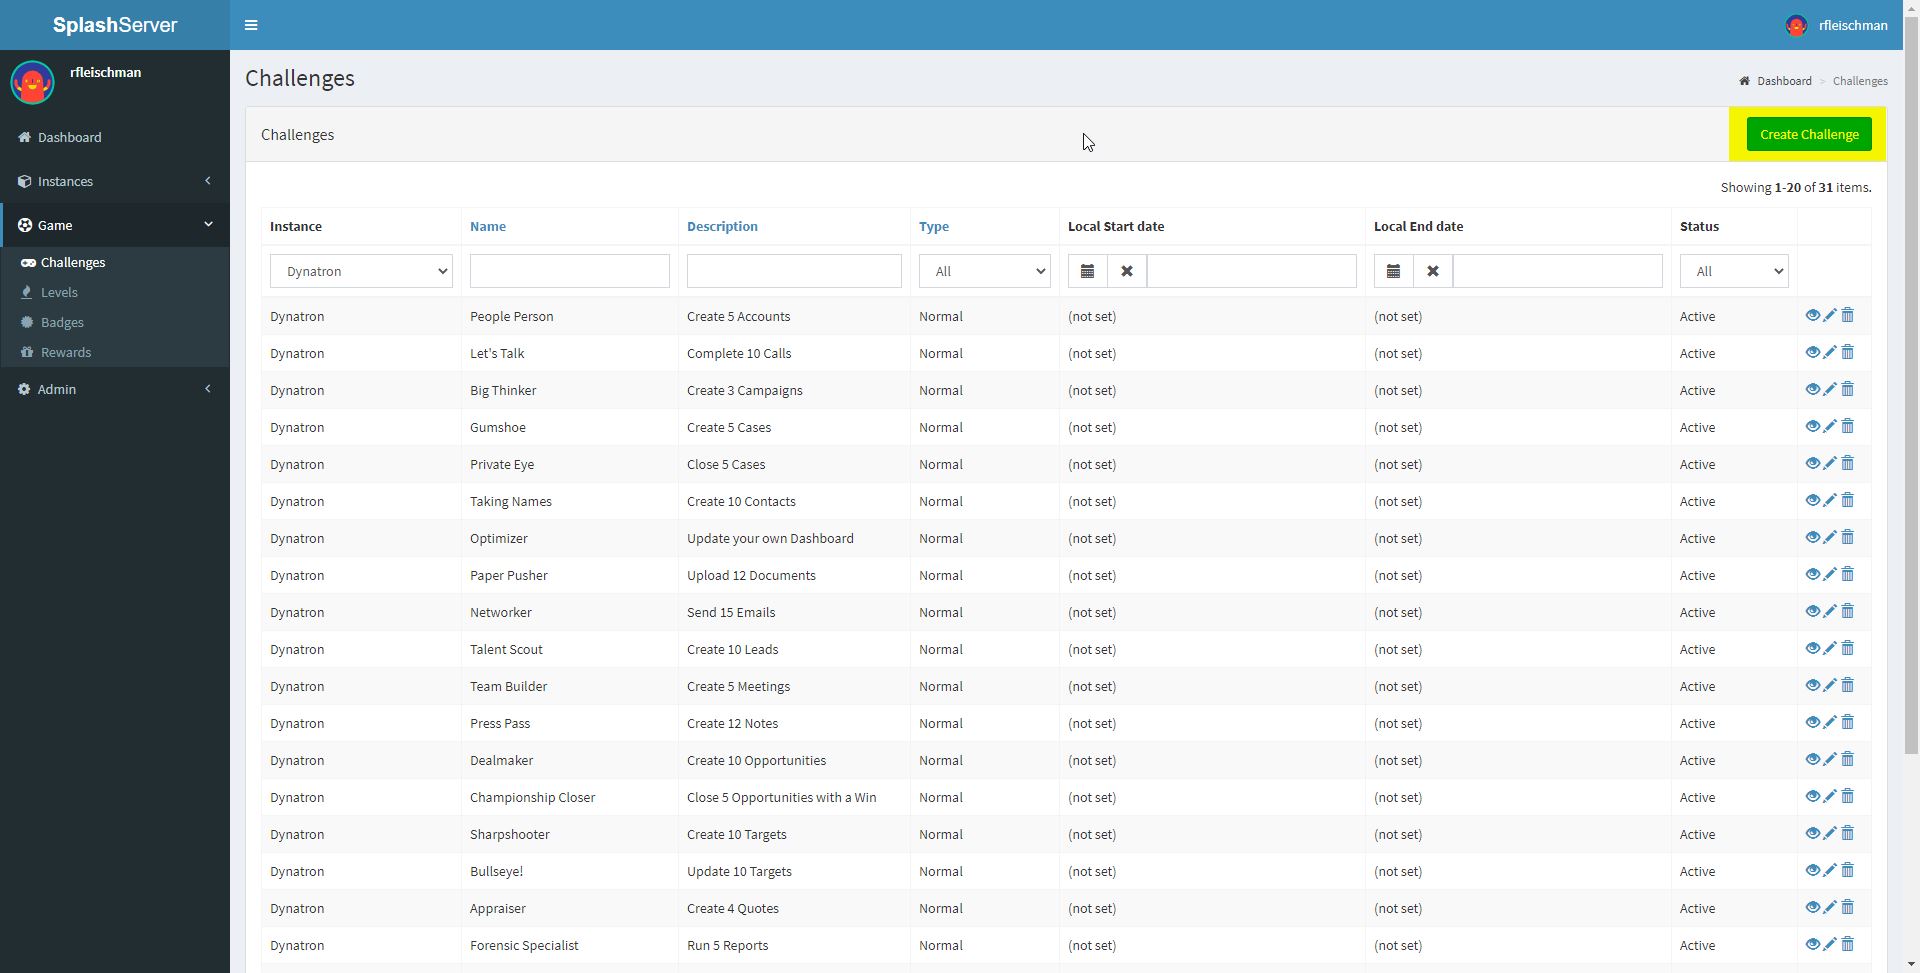
- On the left side of the screen click on the "game" dropdown, you will be able to see the options for Challenges, Levels, Badges, and Rewards
- Clicking on any one will navigate you to the management screen for the respective Game configuration screen (i.e. Challenges, Levels, etc). Each management screen will display the standard out of the box configuration items as well as any custom items that a user previously created. From the management screens you will be able to create new items and modify existing items.
- Each management screen contains a "Create" button in the top right hand corner of the screen.
Creating a New Challenge:
- Click on Challenges under Game on the left hand side
- Click on "Create Challenge" on the top right
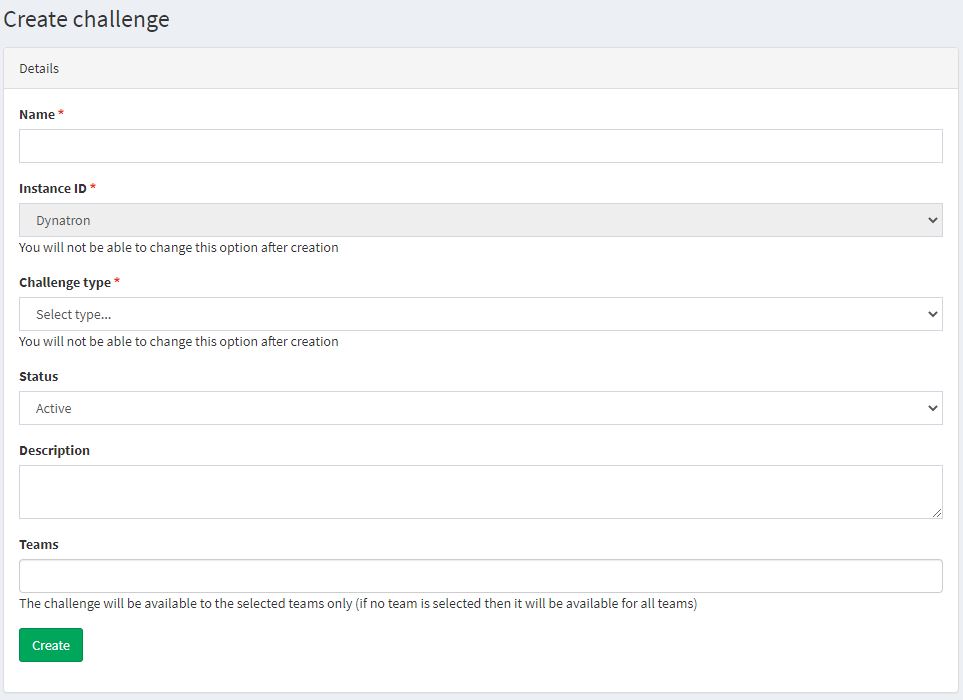
- On the next screen you will need to fill in the details of the Challenge. You will need the name, instance, challenge type, and description
- The "Name" field is whatever you want to call the Challenge. We recommend something that makes the goal of the challenge clear but we also recommend that you try to make it playful. Rather than "Close an opportunity", for example, try "Bringing Home the Bacon". This is supposed to feel fun for the users. Simply creating and tracking more tasks for them will not make it more fun or enjoyable - so get creative.
- The "Instance" field should be filled in for you and is the url of your SugarCRM instance.
- The "Challenge Type" field can be any of the following:
- Normal: Once a condition is met the challenge is complete. This can include a number of calls made, a number of opportunities closed, number of times logged on, or any other action you choose. There is no time limit to complete
- Time based: Similar to a normal challenge but with a time limit. For example: Make 10 calls in 3 days, close 5 opportunities in 1 week. From the time the challenge starts there is a fix time to complete it. A challenge starts when the first of the conditions are met, so the first call made or first opportunity closed. If the challenge isn't completed in the time limit it resets and the user will have to try again
- User based: Similar to time based, however the user determines when the challenge starts. Once they start the challenge they will have a fixed amount of time to complete it.
- If "time based" or "user based" is chosen, then additional fields will need to be filled to say how long they have to complete the challenge.
- The "Description" field is just a detailed description of what the challenge is.
- On the right side you can also fill out the "Rewards" from completing the Challenge. You can set a number of Coins, Points, and a Badge that the user will get for completing the Challenge.
- Coins: The number of coins they will receive for completing the Challenge. Coins can be traded in for Rewards as will be explained later on
- Point category: If you want you can have users earn points in different areas. It helps them see what their strengths are and where they can improve by seeing where they are getting points.
- Points: The number of points they earn for completing the Challenge.
- Badge: If you want you can set them to win a badge for completing a challenge
- Once you've completed the configuration click the "Create" button at the bottom left hand side of the screen.
Adding a Game Activity to a Challenge
Once the screen has reloaded, there will be a new section that appears at the bottom of the screen called "Game activities". This section is for configuring the requirements for completing the Challenge.
- Click on the "Add new" in the right hand corner of the screen.
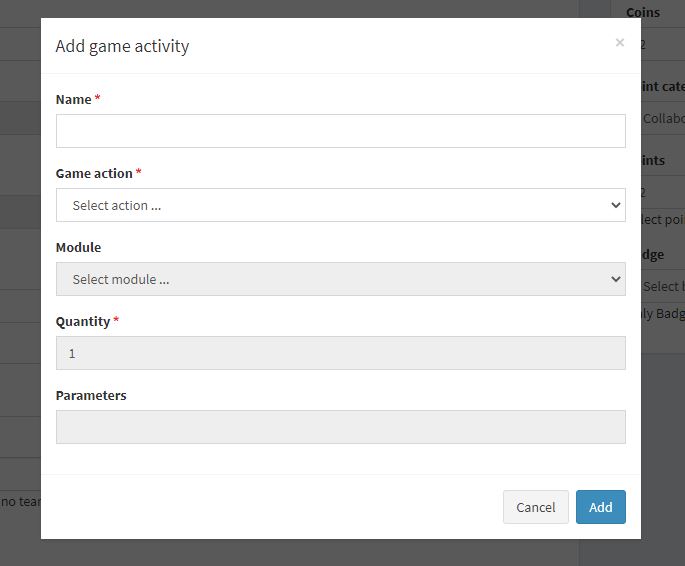
- A modal will appear on the screen that will allow you to add the "Game Activity".
- Name: This is the "Name" of the Game Activity.
- Game Action: Select the "Action" that the user will take when completing this activity. There is a set of standard actions that are automatically configured by the system when the first Game is initiated. If you can't find an action that fits your use case you can create "Custom Actions". This can be done by selecting Admin > Custom actions from the navigation. Once created it will then show in the drop-down list of Game Actions which is accessed from this section.
- Module: This is the module that the Game Action is completed on. Certain Game Actions do not require this input (e.g. Login, Logout, etc).
- Quantity: This is the number of times the Game Action must be completed for the challenge to be completed. For instance, if you wanted users to create 5 new leads to complete this Game Activity you'd set the Game Action to "Create a record", set the Module to "Leads" and set the Quantity to 5.
- Parameters: This currently remains empty.
- Once you've entered all of the values click the "Add" Button.
Creating and Editing Levels:
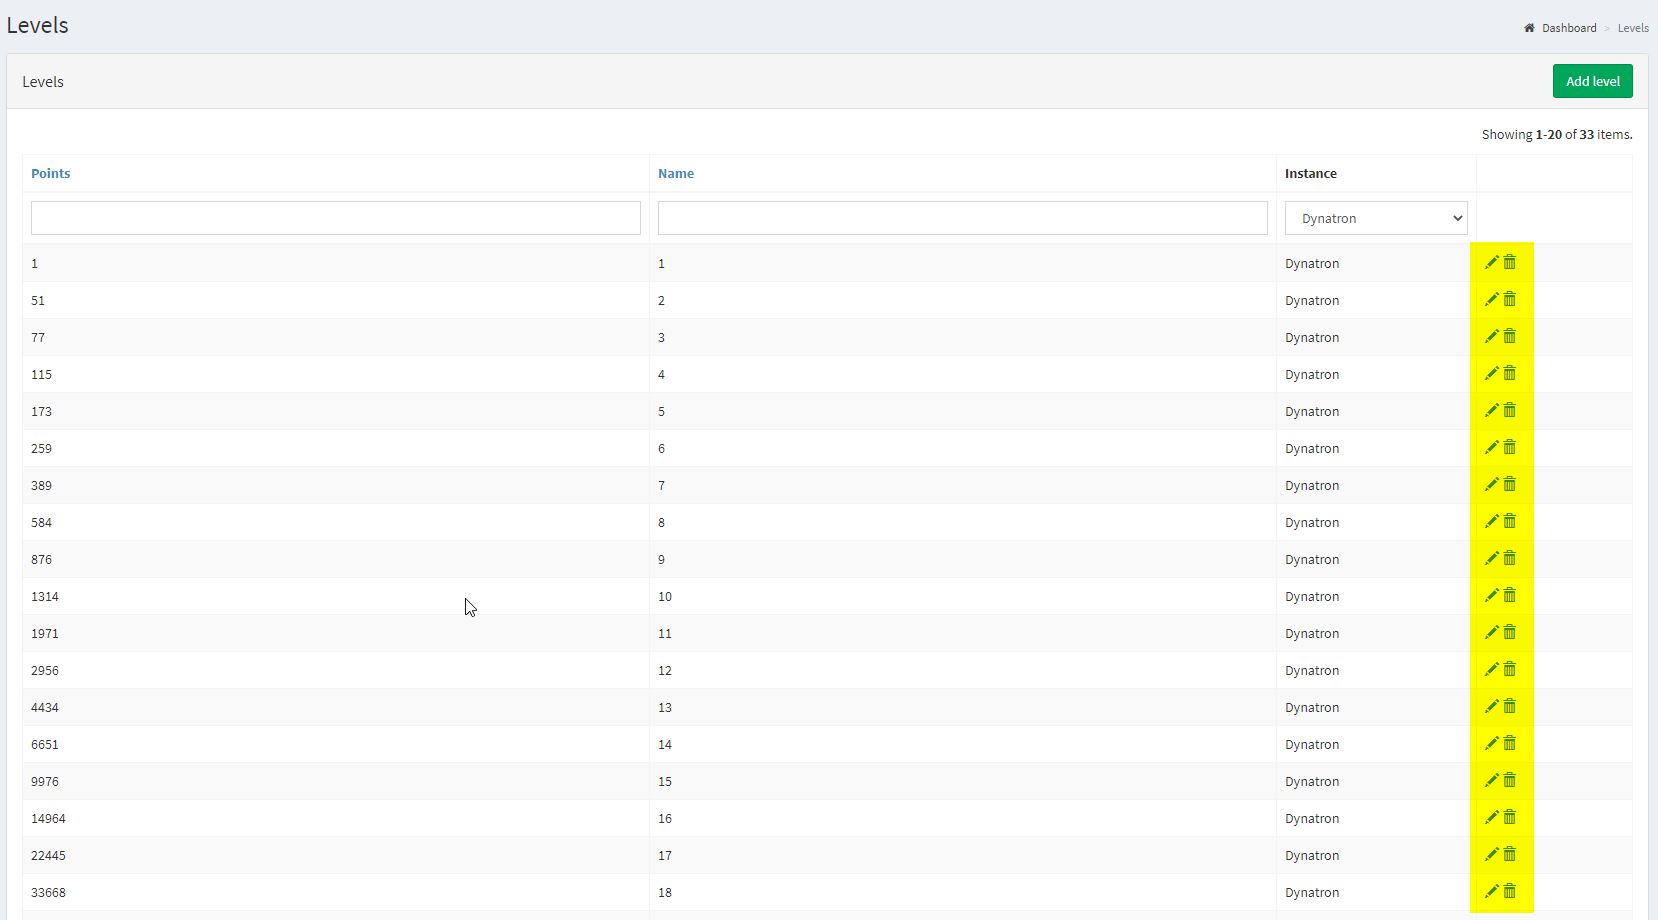
Levels are measured against a users accumulated points. Levels are gained in a linear fashion. As a user accumlates more points they will gradually increase in level. The system configures 33 levels by default but if you want to create additional Levels you can. The default configuration will signify the players Level as a number (e.g. 1, 15, 21, etc). If you'd like to use a text or name based Level system the default Levels can be modified. For example, if a company prefers to have levels ranking from "Novice" to "Master" or "Rookie" to "Veteran" or some other leveling scheme this can be accomplished by simply editing a Level and updating the "Name" field.
Creating a Level
- In the navigation click on Game and then select Levels.
- Once the Levels management screen loads click the "Add level" button in the top right hand corner of the screen.
- The only information to fill out is the Name, the Instance ID, and the amount of Points needed to reach that level
- Name: This field is for the the Name of the Level. Generally these are just Level 1, Level 2 etc. As previously noted, if your organization prefers to it can create its own names for levels (e.g. Rookie 1, Apprentice 5, Veteran 3, etc ).
- Instance ID: This field will fill in for you automatically and should be the URL of your SugarCRM instance.
- Points: This field is used to set the number of Points needed to reach the Level. Once a user has enough points they will reach the level.
- You can also edit or delete levels by clicking the icons to the right of each level. This is useful if you want to create your own custom names for levels and to remove extra levels you no longer need.
Creating Badges:
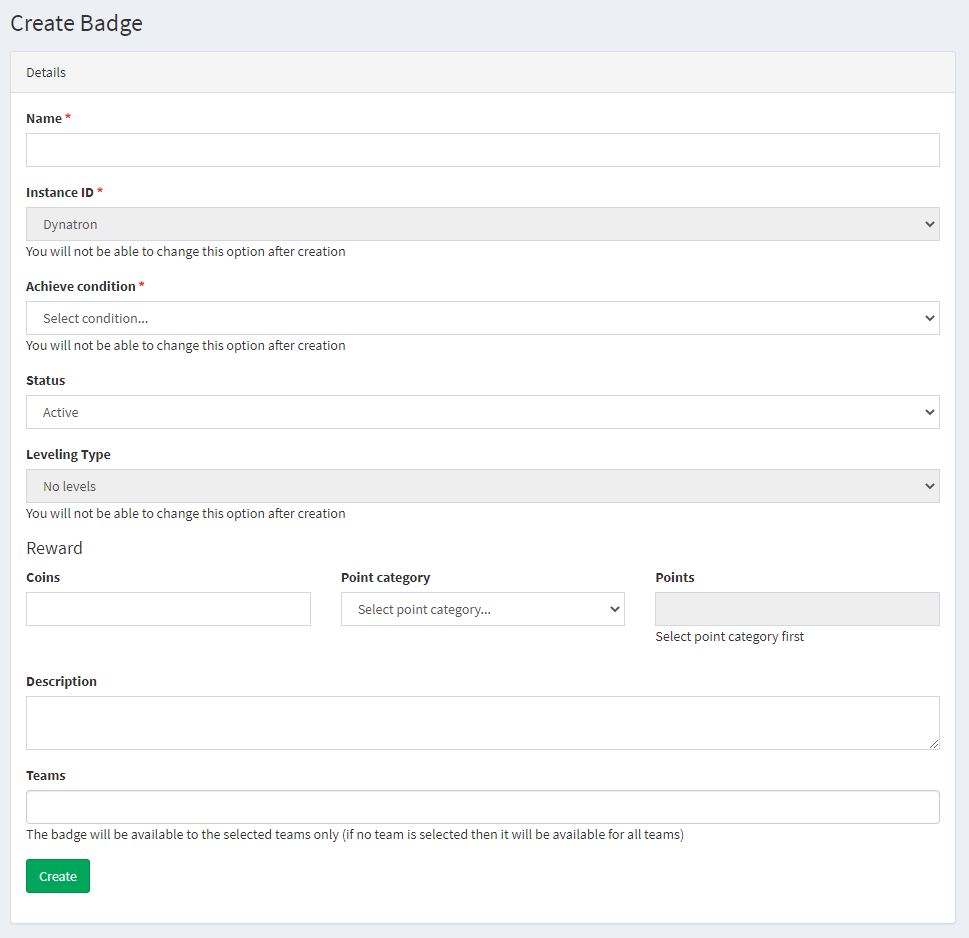
Badges are a reward that are given to users for completing specific Game Activities or Challenges. Badges can also come with their own rewards in the form of Coins and/or Points. Badges are displayed for a user to see in their Splash dashboard within SugarCRM. By default the system is pre-populated with 16 Badges that can be used as configured or modified for an organizations specific use case. An organization can also create and upload their own custom Badges. Below are instructions on how to create your own custom Badges in Splash.
- In the navigation select Game and then choose Badges.
- Once the Badges management screen loads click the "Create Badge" button in the top right hand corner of the screen.
- You will need to enter the following information: Name, Instance ID, Achieve condition, Status, the reward(s), description, and the image of the badge itself
- Name: This field is for the Name you want to give your custom Badge. Once again we would suggest using "fun" names for the badges to encourage engagement. If you need ideas review the 16 default Badges already in the system.
- Instance ID: This field will fill in for you automatically and should be the URL of your SugarCRM instance.
- Achieve Condition: This can either be a Challenge or a Game activity, By selecting, "Challenge" this Badge will only be awarded when a the assigned Challenge has been completed. When selecting "Game Activity" the badge will be awared when the user completes the assigned Game Activity. You will assign this after you create the badge in the same way that you would assign a Game Activity to a Challenge.
- Status: This field designates if the Badge is active or inactive. You can set a Badge to inactive if you don't want to start awarding it yet.
- Rewards: You can assign Coins and Points to be awarded when getting a Badge. You can designate a Point Category. (Note: Point Category is part of a feature that is on the development road map but has not been finished. In the future users will be able to see their points by category and admins will be able to report on this.)
- Description: This is a more detailed description of what the Badge is for the users. Often organizations write a description of the Badge and how it is won so users know why they got the Badge.
- Teams: This field is used to designate which Teams are eligible to receive this Badge.
- Badge: This is an upload field that allows you to import the physical image of the Badge for users to see. Uploading an image of the badge gives the user something material to collect, measure their overall work acheivements, and compare with others in the organization. Be creative and make them interesting. The goal is to give users a sense of excitement and accomplishment. The best way to do that is to give them something cool and interesting for their work.
Creating Rewards
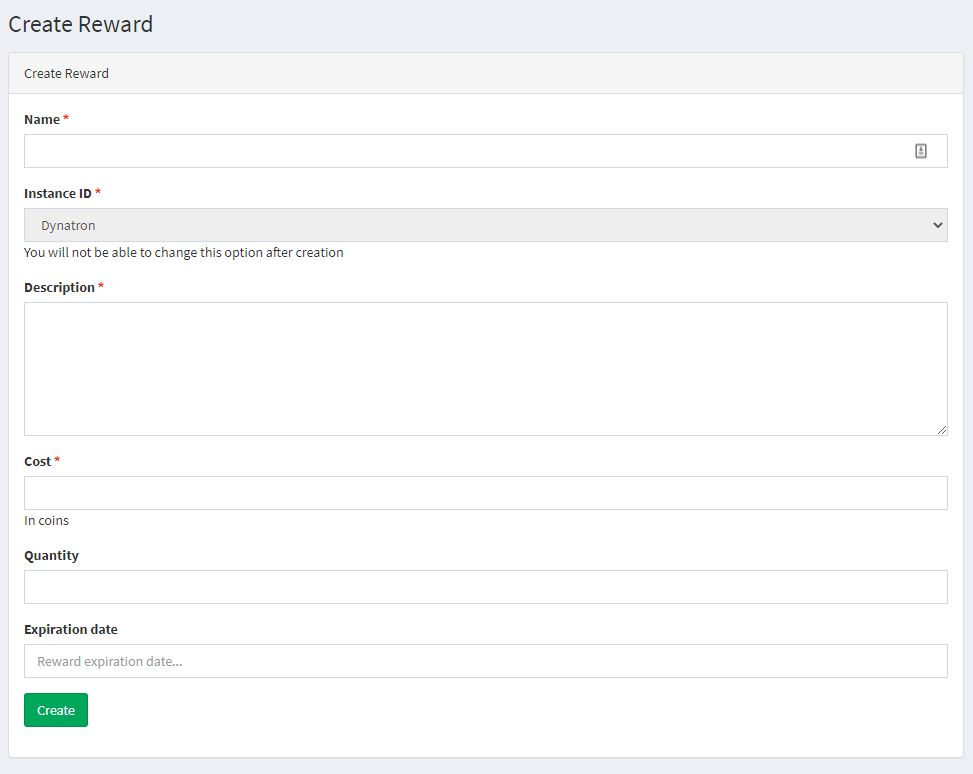
Rewards are just what they sound like, "Rewards". These are things that the user can exchange Coins. The system comes prebuilt with 8 example Rewards and are meant to get your creative juices flowing. We encourage every organization to work collabratively with employees to find out what Rewards would be meaningful and motiviating to them. This step is crucial for creating a system that is motivating. You can work hard to create an engaging system but if it isn't motivating then the effectiveness of the program will be low. This is an opportunity to make employees feel like their input is valued and see that input materialize into sweet sweet Rewards. Below are instructions on how to create your own Rewards in Splash.
- In the navigation select Game and then select Rewards.
- Once the Rewards management screen has loaded click the "Create Reward" button in the top right hand corner of the screen.
- You will need to enter the Name, Instance ID, Description, Cost, Quantity and Expiration Date
- Name: This field is for the Name you want to give your Reward.
- Instance ID: This field will fill in for you automatically and should be the URL of your SugarCRM instance.
- Description: This is a more detailed description of what the Reward is and how to get it.
- Cost: This field designates how many Coins users will need to spend to get the Reward.
- Quantity: This field is used to limit the number of times this Reward can be award across the entire user base. For example, if the reward is a free lunch and you want to limit it to just 5 people you can set the Quantity to be 5.
- Expiration Date: This field is used to designate a date that the Reward expires. For example, if you created a Reward that gave users tickets to a concert then setting an expiration date would ensure users wouldn't attempt to claim the Reward past the date of the concert.

